
Color Correction
Removing a Color Cast in Photoshop
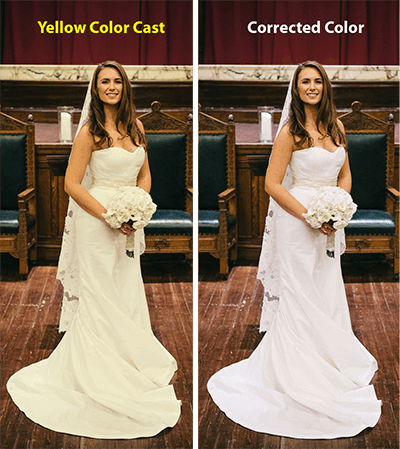
A Color Cast is an abnormal tint of a particular color (usually unwanted), which shifts the color in photo. Color Balancing, also known as white balance correction, is the process of neutralizing a color cast.
Typically due to lighting issues, a color cast can be corrected in Photoshop with relative ease.
Photos shot under incandescent lighting, as well as older photos, often have a yellow color cast. Photos shot outdoors tend to have a blue tint. Photos shot from film may have been developed using old or poorly mixed developing solution.
As with many techniques in Photoshop, there are methods of fixing a color cast problem. In this tutorial we will discuss several techniques, starting with the easiest and finishing with the most precise white balance correction methods.
Four Methods — Depending on How Perfect You Need It to Be!
Auto Balance Method
White Balance Correction
Thresholds Method
Neutral gray and the gray Eyedropper
Each of the Photoshop techniques we will discuss first begins by creating an “adjustment layer” (found in the layers pallet).
The great advantage of using an adjustment layer is that they are completely non-destructive, i.e. the original image is intact and unchanged. Thus, there is no need to make a copy of the original image first. You can always revisit an adjustment layer and make additional changes, or delete it entirely and you are back to the original look of the image.
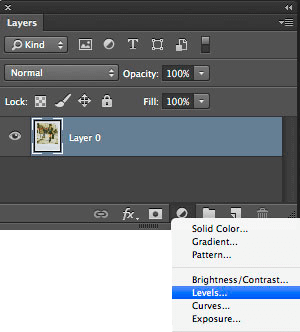
1. Begin in the Layers Menu Pallet. Click on the icon"Create new fill or adjustment layer" or from the main menu, select:
LAYER > NEW ADJUSTMENT LAYER > LEVELS
Removing a Color Cast with the AUTO Balance Button
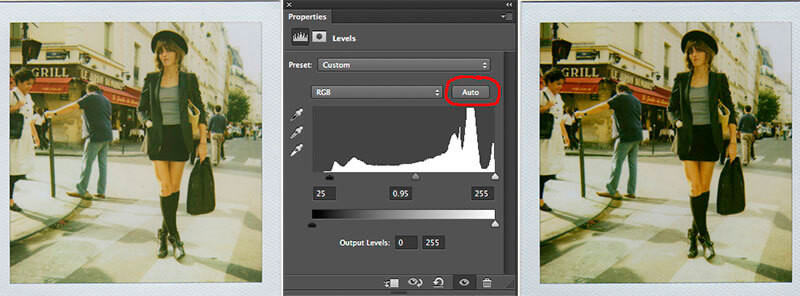
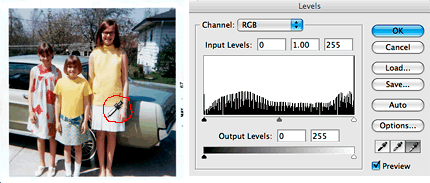
Once you create the new Levels Adjustment Layer, the Properties Pallet will automatically open. In the middle you will see a graph in the middle of the Properties menu that resembles hills and valleys, know as the photo's Histogram. The histogram represents the exposure of the image.
The first method of correcting the White Balance in an image is by simply clicking the “Auto” button in properties menu. Sometimes this simple one-click method works reasonably well to improve the color balance in the image and reduce or remove a color cast in the photo. At other times it may appear to do nothing at all, but its always worth a try.
Before editing an image, it's a good practice to inspect the image's histogram first. Note in the histogram graph below there are three triangular-shaped controls that can be adjusted. These triangular tabs are used to adjust the Shadows, Midtones, and Highlights of an image. If either the left or right side of the shape has an area where there is no area in the graph at all, there are issues with the image's exposure that need to be corrected.
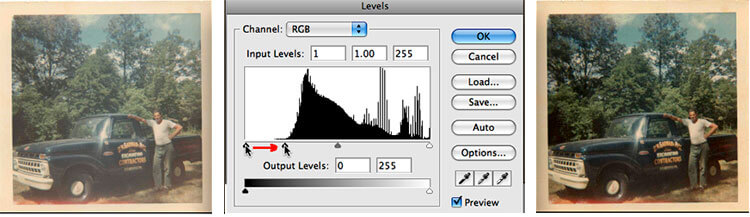
In the histogram of the old Polaroid truck above you will note that there is a fairly large gap to the left side of the histogram's shape (the shadows portion). To correct the problem, simply slide the left tab to the right, stopping just into the beginning of the histograms curve. This helps to correct a poorly exposed image.
Removing a Color Cast by Correcting White Balance
To properly removing a color cast in a photo we must correct the White Balance of the image.
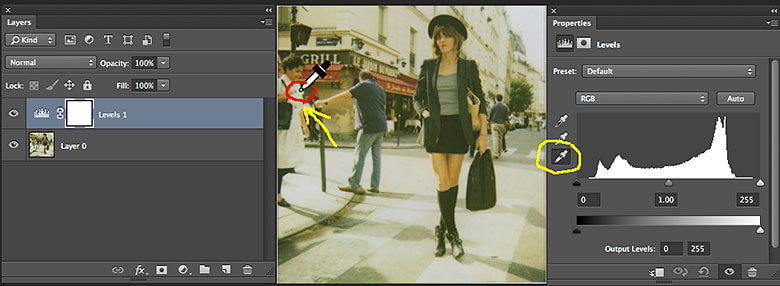
Notice the three eyedropper icons (shown left). In some versions of Photoshop you will find them in the Properties Tab that automatically opens when a levels, curves or exposure adjustment layer is made. In earlier versions of Photoshop you will see them in the levels menu, such as in the old truck histogram shown above.
These three eyedropper icons are used to set white, gray and black points in an image.
When there is a color cast in an image, it is as if the image is "confused" about what is supposed to be white, black and neutral gray. We “fix” the problem by showing Photoshop where these points of reference can be found in the photograph with these eye dropper tools.
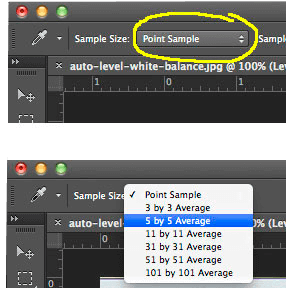
First, check your settings for the eyedropper tool in Photoshop.
When you single-click on one of the eyedroppers the upper menu bar is an adjuster for the Sample Size that Photoshop takes with the eyedropper.
The default setting is “Point Sample,” which only evaluates a 1 pixel square. Change the settings to a larger sample, such as a 5 X 5 average pixel sample.
With your dropper sample set to larger than 1 pix average, open an image with a color cast that you want to fix the color balance. In the Layers Menu, create a levels adjustment layer, which will make the Properties Menu pop open and then single-click on the white dropper tool in the Properties Menu. With the white eyedropper hover over your image and look for an area that SHOULD be nearly totally white (if it didn't have a color cast), and click on the image with the eyedropper tool.
After clicking the image with the eyedropper, the photo and the histogram will change. Note that there are also gray and black eyedropper icons as well. Now select the black eyedropper and click on an area that SHOULD be nearly totally black. After making these two (white and black) eyedropper adjustments the image should, like magic, have the color cast totally removed.
As stated previously, in older versions of Photoshop the eyedropper tools are in the Levels Menu itself, so you will not see a Properties Menu pop open.
The technique described above, however, is exactly the same. After opening an image in Photoshop, make an adjustment levels layer and select the white eye dropper tool in the Levels dialogue box. Do make sure that the "preview" box is checked.

This old Polaroid photo has developed a yellow color cast from age. Select the white eyedropper tool and look for what should be nearly pure white in the image. Then click on that area with the eyedropper tool. Then select the black eyedropper and click on what should be nearly pure black. Like magic, the color cast has been removed!
White Balance Correction Using Thresholds
To improve our accuracy in selecting the whitest and blackest areas in an image, we need a non-subjective method of making the choice.
While the two methods shown above are the easiest methods of repairing a color cast, they are not the best method.
Our eyes are subjective, and not as precise in determining the best areas within an image to determine where to map the white and black points. Photoshop can help us select the white and black points with far more accuracy than the naked eye is capable.

Open the Threshold Dialogue Box
Image > Adjustments > Threshold
The Thresholds Dialog has a graph that looks similar to a histogram.
The image you are working with will turn into a black-and-white preview.
Setting the Black Point
Our first objective is to find the darkest black portion of the image.
Begin by sliding the middle slider toward the left.
The image will begin shifting toward all white.
Stop sliding just before the entire image turns white
(you may want to zoom in on whatever remains black).
As you hover over the remaining black area, the pointer will turn into an eyedropper. Hold down the SHIFT key, and click in the black area. A cross-hair mark will be made in that spot.
This marker becomes the black reference point we will be using later on to correct the white balance.

Setting the White Point
Now slide the threshold toward the right to find the lightest white within the image. Stop sliding just before the entire image turns black.
As you hover over the remaining white area, the pointer will turn into an eyedropper.
Hold down the SHIFT key, and click in the white area. A cross-hair mark will be made in that spot.
This is the white reference point we will be using to correct the white balance.
Important: Click “Cancel” (not the “OK” button) in the Threshold +Dialogue Box; we were only using the tool to mark the black and white points.
Now that we have plotted the lightest white and the darkest black areas in our image, create a Levels Adjustment Layer Layer > New Adjustment Layer > Levels
This time, when we click on the white and black eyedropper tools in the levels dialogue box, the points we made in the threshold dialogue box are there waiting for us. We can now make much more accurate selections to correct the white balance!
The gray Eyedropper Tool in Photoshop
The MOST Precise Color Cast Correction Method in Photoshop
If you want absolute perfection of color balance, Photoshop does have a method… the gray Eyedropper Tool.
The only problem is this: we must find an area in the image that is EXACTLY neutral gray (precisely 50% black) in order to produce absolute perfect results.
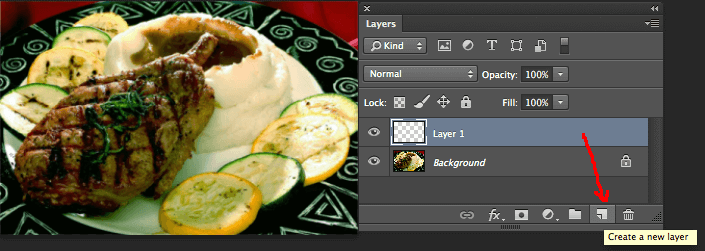
Start by making a new layer (not an adjustment layer this time, just a blank empty layer).
You can click the “create a new layer” in the Layers Palette, or from the top menu in Photoshop select Layer > New >Layer
Next we need to fill it with 50% gray:
in the top menu select Edit > Fill > 50% Gray
In the LAYERS Palette, with your new 50% gray Layer selected, we need to change the “Blending Mode” of the gray layer.
By default the Blending Mode is set to “Normal,” but change it to “Difference”. Your image should now look like a color negative (left).
With the Layer Blending Mode set to “Difference” the pixels are inverted, so pixels containing 50% gray are turned to 100% black. Thus, the darkest black areas in the negative-looking image are the closest to a perfect neutral gray, which is exactly what we are looking for!
Now we need one more layer: a Thresholds Layer
Layer > New Adjustment Layer > Threshold
With the addition of the Threshold Layer the image
will at first appear to be ALL BLACK.
Begin sliding the adjustment triangle
(located under the graph) towards the left.
You will begin to see the image to begin to appear like
a black-and-white sketch. Continue to slide the adjuster
to the left until the black virtually disappears,
but leave just one or two pixes that still show as black .
After you slide the threshold adjuster to the left until only 1-2 black pixels remaining (and everything else is white) the few pixels that are still black are in reality the “perfect neutral gray” part of the image that we've been looking for. We need to mark it for use later in this tutorial.
Zoom in on your image to the 1-2 remaining black pixels and select the Color Sample Eyedropper Tool (behind the behind the regular Eyedropper Tool) and move the cursor over to your image and click it to mark the black pixel(s) that is actually your neutral gray point. A small target symbol will appear on the spot that you clicked on with the Color Sampler Tool.
Our two prep layers can now be deleted (the layer filled with 50% gray and our Threshold adjustment layer) as they are no longer needed.
Now create a New Adjustment Layer (the icon at the bottom of the Layers panel). Select either Levels or Curves, it doesn't matter which you choose. Click on the Set gray Point icon (the one in the middle).
The 50% gray marker we made earlier is there waiting for us. Zoom in very close to be sure the correct pixel is selected. You may find it helpful to press the Caps Lock Key on your keyboard which will change the dropper icon to a target symbol, making it easy to line them up and then click. As you click on the on the marker we made earlier with the gray eyedropper, the color cast will be removed with absolute precision.
The color cast has now been completely corrected, but, as with a recipe in a kitchen, you may want to “season to taste”and make any adjustments to contrast, color enhancements, sharpening, etc.
Need Graphic Design Help?

If your company needs help with graphic design, TSOQ Printing has professional graphic designers on staff that can help you!
If you have any questions about our services, need a price quote, or want to speak with an expert for some questions about printing or graphic design, please don't hesitate to contact us.
We will be happy to assist you!
Our printing company is available by phone at 718-523-7246, Live Chat or email.